Folded Star Potholder Tutorial

Folded Star Potholders

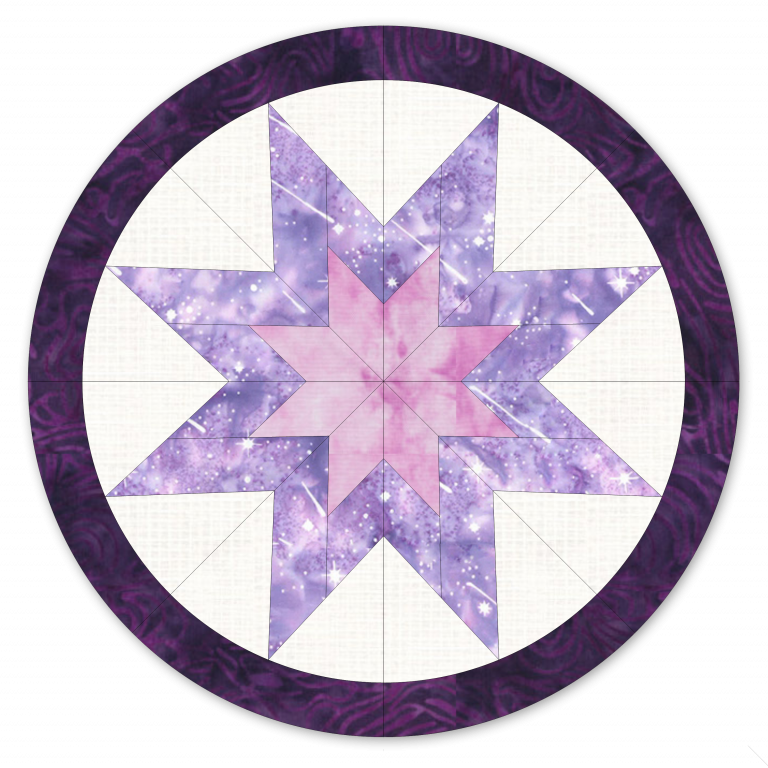
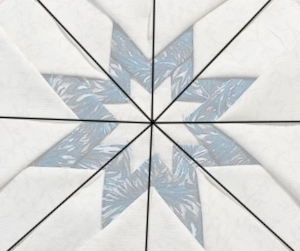
At our January 2025 meeting, the marvellous Mouse Saint guided us through the process of making stunning folded star potholders. Whether you couldn’t attend or simply want to make another, this tutorial will walk you through each step so you can create your own.

This version of the folded star uses a slightly different technique than the one many of us may be familiar with. Plus, it includes circular binding—an extra challenge that makes the finished piece even more special! So grab your fabric, get comfortable, and enjoy giving this fun and rewarding project a go.

You can follow along online with the full tutorial below, or if you prefer a printable version you can download the step-by-step PDF guide just click the link. 

Folded Star Potholder Pattern

Folded Star Potholder - Step by Step Tutorial

Photos and Written Instructions by Mouse Saint

Supplies

For this project you will need:

Sewing Machine and Basic Sewing Kit inc:

Pins

Fabric Scissors or Rotary Cutter & Mat

Non-permanent fabric marking tool

Small Ruler

Hand Needle & Thread

Glue

Fabric:

(Cotton or other heat tolerant fabric)

Round 1 – Four x 4″ Squares

Round 2 – Eight x 5″ Squares

Round 3 – Eight x 5″ Squares

Bias Binding – 2″ x 25″

Ribbon – 6″

Backing – One x 8″ Square

Foundation Fabric – One x 8″ Square

Wadding – One x 8″ Square

Insulation (eg insul-bright) – One x 8″ Square

Instructions

Preparation

Step 1

Press the foundation square in half and then into quarters.

Step 2

Fold each square in half, right side down, and then fold up the sides into the middle to form triangles.

Step 3

Stitch across the top of the triangle, about an 1/8″, to help keep their shape when positioning.

Round One

Step 4

Position the round 1 triangles so that they follow the fold lines in the foundation. A small dab of glue on the points will keep them in place.

Pin and sew with a 1/4″ seam.

Step 5

From the centre mark 1/2″ on all four pieces.

Round Two

Step 6

Position 4 of the round 2 pieces onto the marks you’ve made, again glue helps, pin and sew.

Step 7

Measure 1/2″ from the very centre point.

Step 8

Position the remaining round 2 pieces, pin and sew.

Round Three

Step 9

Do the same again with the first 4 pieces of round 3, measuring 1/2″ from the round 2 points.

Pin and stitch.

Add the remaining 4 triangles, pin and stitch.

Step 10

Stitch across all 8 sections using the centre fold lines as a guide.

Sandwich and Shape

Step 11

When all of the triangles are stitched into place, use the circle template provided to mark out your circle, centring the small hole over the middle.

Step 12

Make the quilt sandwich. Background fabric, right side down, wadding, insulbrite and then the sewn piece on top.

Stitch on the line drawn in step 11 to secure all pieces together.

Step 13

Trim excess fabric away, roughly 1/4″ from the stitches.

You can use scissors or your rotary cutter making small straight cuts.

Add Binding

Step 14

Add the double fold bias binding to the front of the pad using a 1/2″ seam allowance.

Step 15

Fold the binding over to the back and add in the hanging loop, either ribbon or excess binding

Don’t pull the binding too tight or it will bend the front!!

Step 16

Slip stitch the binding onto the back of the pad, keeping it as close to the stitched line as possible.

Press from the back first and then press the front.

Well done!! You've made a folded star hot pad!